Photographing the Northern Lights
HOW TO PHOTOGRAPH THE LIGHTS
First off, there’s nothing wrong if you just go to admire the show without taking pictures. Your evelasting memories are more important (the tour company may even provide pictures for you, but ask first).
If you want your own pictures (and bragging rights proof) you need to know a few things; aurora photography is not the same as snapping quick pictures of flowers and pretty landscapes. It’s harder and there are many things to keep track of.
The aurora will get very bright if you’re lucky, but it’s not as bright as the sun. You’ll need a camera that allows for manual settings of exposure time, aperture (f-number) and ISO. You will also need a tripod and a remote.
ISO
ISO is your camera’s sensitivity to light and has settings such as 200, 400, 800 or 1,600; you’ll need a higher setting (more sensitivity), but higher settings introduce noise in pictures (less in newer cameras) so there’s a trade-off.
EXPOSURE TIME
Exposure Time is the time light is allowed to hit the sensor. A setting of 50 might be standard for a camera; this only means 1/50 of a second, so you’ll need a lot more. The trade-off? Any movement of the camera will show up in the pictures with longer exposure times.
APERTURE
Aperture (or f-setting) sets how wide the hole through which light passes to the sensor will be. For our purpose, the lower the setting (i.e. 1.8) the better (lower settings mean a wider hole). Lower settings mean you need to pay more attention to focusing (more on that later). For a good low setting more expensive lens may be needed.
WHITE BALANCE
White balance: just use the Auto setting. Some people also recommend the Direct Sunlight setting.
Our recommendations: go as low as you can with your f-setting. 1.8 is great if you have it; 3+, not so much. Then, use either one of the following setups: 1. ISO 200 or 400 and a longer exposure time, i.e. 8-10-15 seconds – this will allow for smoother pictures, but any movement in the scene will be blurry and you’ll get small star trails due to the Earth’s rotation around its axis; 2. Alternatively, use ISO 800 or 1,600 and a smaller exposure time, i.e. 3-4 seconds – you’ll get noise due to the higher ISO, but no blurs and trails.
You really need to experiment with different settings until you get it right. Your results will depend on your settings as well as general conditions – intensity of aurora, Moon light, any clouds partially obscuring the lights, etc.
FOCUSING
Focusing is very important in aurora photography. Your auto-focus function will not work with the northern lights and your pictures will be blurry. How can we fix that? First, use your auto-focus function to focus on a star (shutter half-pressed) if your camera will allow it; if this doesn’t work, focus on any distant object such as the Moon, lights from a really distant city, building, bus, car, etc (even though you should be as far away as possible from those and there should be a new moon – tough one!).
After you’ve auto-focused on a distant object, switch your focus to manual and leave it that way. If nothing works, just manually focus in increments until you get it right. In any event, always check picture sharpness by zooming in in the preview screen. Don't get home after a great night to see that all your pictures are blurry and have focus issues.
CAMERA STABILITY
When using longer exposure times your camera needs to be as stable as possible (even if longer means 1-2 seconds). You will need a tripod if you’re serious about your pictures. We don't really like to carry these around, but there’s no other way. Holding your camera in your hand will ruin your pictures through movement even if exposure time is half a second. If you use your camera’s default short exposure times, you wont see much of the aurora in your pictures.
Even with a tripod, you will move your camera when pressing the shutter button. Use your delayed shutter release function, or better yet get a remote for your camera.
COMPOSITION
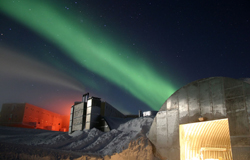
The aurora may be great, but your pictures will be a lot nicer if there’s more to them than pretty lights. Include mountains, water, distant cities or villages, passing cars, electricity poles, houses and buildings, fires, stars, clouds, etc. Experiment with different settings and compositions.
Our recommendations: do not forget about focusing or you’ll ruin your pictures. Do not use flash – it will ruin you pictures. Use a tripod and a delayed shutter release or remote so your camera won’t shake. Pay attention to composition. Have a small flashlight to adjust settings on your camera – hopefully it should be very dark where you’re at. Charge your battery every night before you go out – cold affects batteries. Bring spare memory cards.
Tip: take multiple sequential shots with the same settings and composition that you can later animate into short movies to observe aurora movement.
The next chapters presents Resources for planning your Northern Lights trip.